部落格
建立自己的CMS-Blog
自己的 Blog 自己架!擁有自己架設的 Blog 是件很酷的事吧!讓我們開始吧
首先我們要建立一個 django CMS 專案,如果你已經有現有的專案,可直接到 STEP2
什麼是 CMS 呢?就是在頁面點兩下就可以編輯,像是菜單的價目表,點兩下就可以快速調整價錢、更換菜單
requirements: django > 1.11, Python ==3.7
建議建立一個虛擬環境,並啟用它
>> conda create --name myenv python=3.7
STEP1:
建立 CMS 專案
>> pip install djangocms
到你想要的地方建立一個資料夾,並 cd 到裡面
>> mkdir myProject
>> cd myProject
建立一個新專案
>> djangocms mysite
以下為編輯 base.html 的簡單教學:
最前面加入:
{% load cms_tags sekizai_tags %}
{% load static from staticfiles %}
</head>前加入
{% render_block "css" %}
<body>前加入
{% cms_toolbar %}
</body>前加入
{% render_block "js" %}
最後在要編輯的文字或圖片改為:
{% placeholder 'contentName' %}
接著就可以在這裡建立自己的 Blog 了!
STEP2
安裝 aldryn-newsblog
>> pip install aldryn-newsblog
在settings.py 的 INSTALLED_APPS 的 ‘cms’下方新增以下:
 'aldryn_apphooks_config',
 'aldryn_boilerplates',
 'aldryn_categories',
 'aldryn_common',
 'aldryn_newsblog',
 'aldryn_people',
 'aldryn_reversion',
 'djangocms_text_ckeditor',
 'parler',
 'sortedm2m',
 'taggit',
 # you will probably find the following already listed:
 # 'djangocms_test_ckeditor',
 # 'easy_thumbnails',
 # 'filer',
確認 settings.py 的THUMBNAIL_PROCESSORS 如下:
THUMBNAIL_PROCESSORS = (
'easy_thumbnails.processors.colorspace',
     'easy_thumbnails.processors.autocrop',
     # 'easy_thumbnails.processors.scale_and_crop',  # disable this one
     'filer.thumbnail_processors.scale_and_crop_with_subject_location',
     'easy_thumbnails.processors.filters',
 )
在 settings.py 新增:
ALDRYN_BOILERPLATE_NAME='bootstrap3'
及
STATICFILES_FINDERS = [
     'django.contrib.staticfiles.finders.FileSystemFinder',
     'aldryn_boilerplates.staticfile_finders.AppDirectoriesFinder',
     'django.contrib.staticfiles.finders.AppDirectoriesFinder',
 ]
 #'aldryn_boilerplates.staticfile_finders.AppDirectoriesFinder', // needs to add before'django.contrib.staticfiles.finders.AppDirectoriesFinder'
STEP3
>> python manage.py migrate
STEP4:新增 apphook
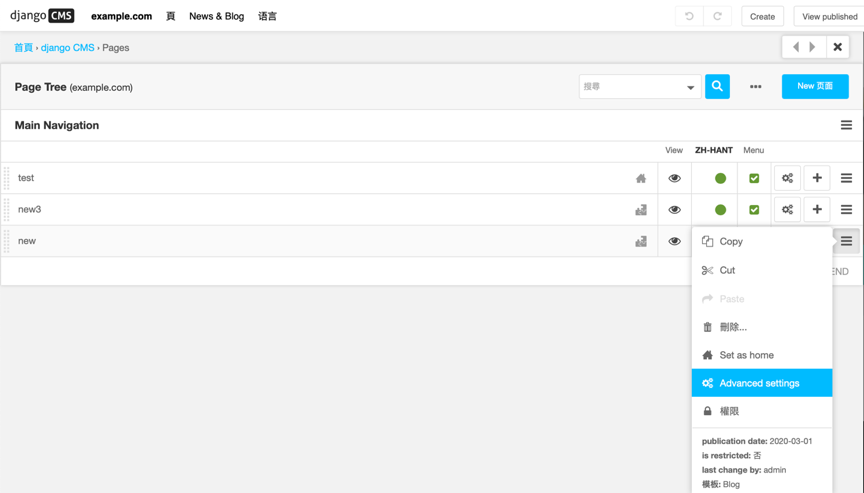
先建立一個頁面: Page/Create Page/New Page…
接著,進入Advanced settings

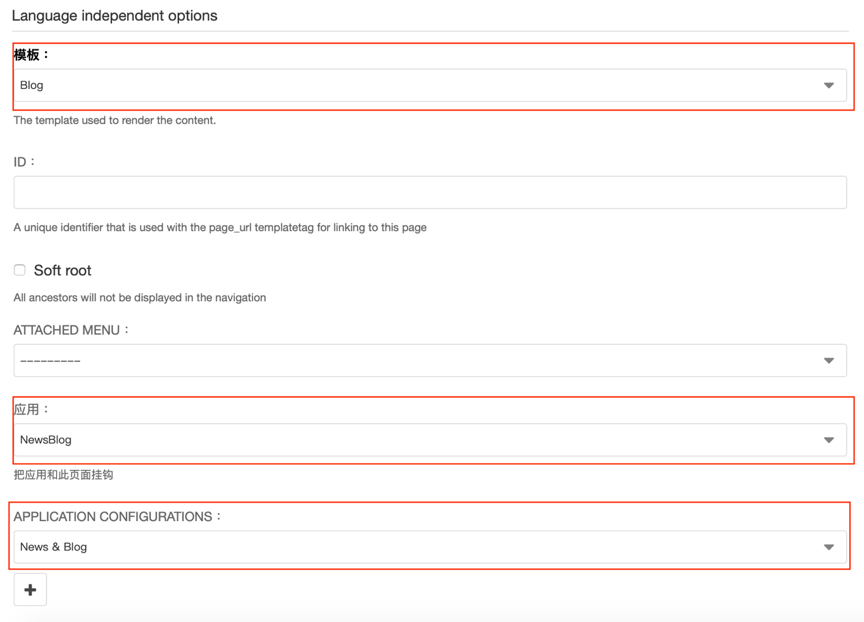
完成以下設定即可

Blog 為在 templates 下建立的 Blog.html,這個名字可以自己取名,或是在套用網路上合法的樣板。
這樣就完成自己的第一個 Blog 了!
參考資料:
http://docs.django-cms.org/en/latest/introduction/01-install.html
http://docs.django-cms.org/en/latest/introduction/09-third_party.html

點擊立即下載此篇文章 PDF
稍後下載閱讀,或與好友分享


留言
pazapz@mailbox.in.ua
x2yr68
pazapz@mailbox.in.ua
1ir4rj
pazapz@mailbox.in.ua
kax959
pazapz@mailbox.in.ua
bf1foo
pazapz@mailbox.in.ua
tum5z7
pazapz@mailbox.in.ua
fnnv5w
pazapz@mailbox.in.ua
e6y8sv
pazapz@mailbox.in.ua
gl1o1t
pazapz@mailbox.in.ua
08d5jc
pazapz@mailbox.in.ua
zk4vdd
pazapz@mailbox.in.ua
zk4vdd
pazapz@mailbox.in.ua
gwnpjt
pazapz@mailbox.in.ua
gwnpjt
pazapz@mailbox.in.ua
rtnvwx
pazapz@mailbox.in.ua
rtnvwx
pazapz@mailbox.in.ua
9aqkc0
pazapz@mailbox.in.ua
9aqkc0
teemiaFaf@mailsphere.xyz
<a href=https://fastpriligy.top/>how to buy priligy in usa reviews</a> EUG and AST potentiated the anticancer activity of DOX through epigenetic histones acetylation along with the immunonomodulation of different apoptotic approaches in MCF7 cells